ADDING COMPLETE FIGURES
Creating a composition that shows a complete person can be challenging. A standing figure is much taller than it is wide, so the fig ure should be positioned so that its action relates naturally to the eye level of the viewer and the horizon line. To place more than one figure on the picture plane, use perspective as we did with the portrait heads. Remember that people appear smaller and less distinct when they are more distant. For comfortable placement of people in a composition, they should be on the same eye level as the viewer with the horizon line about waist high.


Full Figure Placement In thumbnail A, the subject is too perfectly centered in the picture plane. In thumbnail B, the figure is placed too far to the left. Thumbnail C is an example of effective placement of a human figure in a composition.
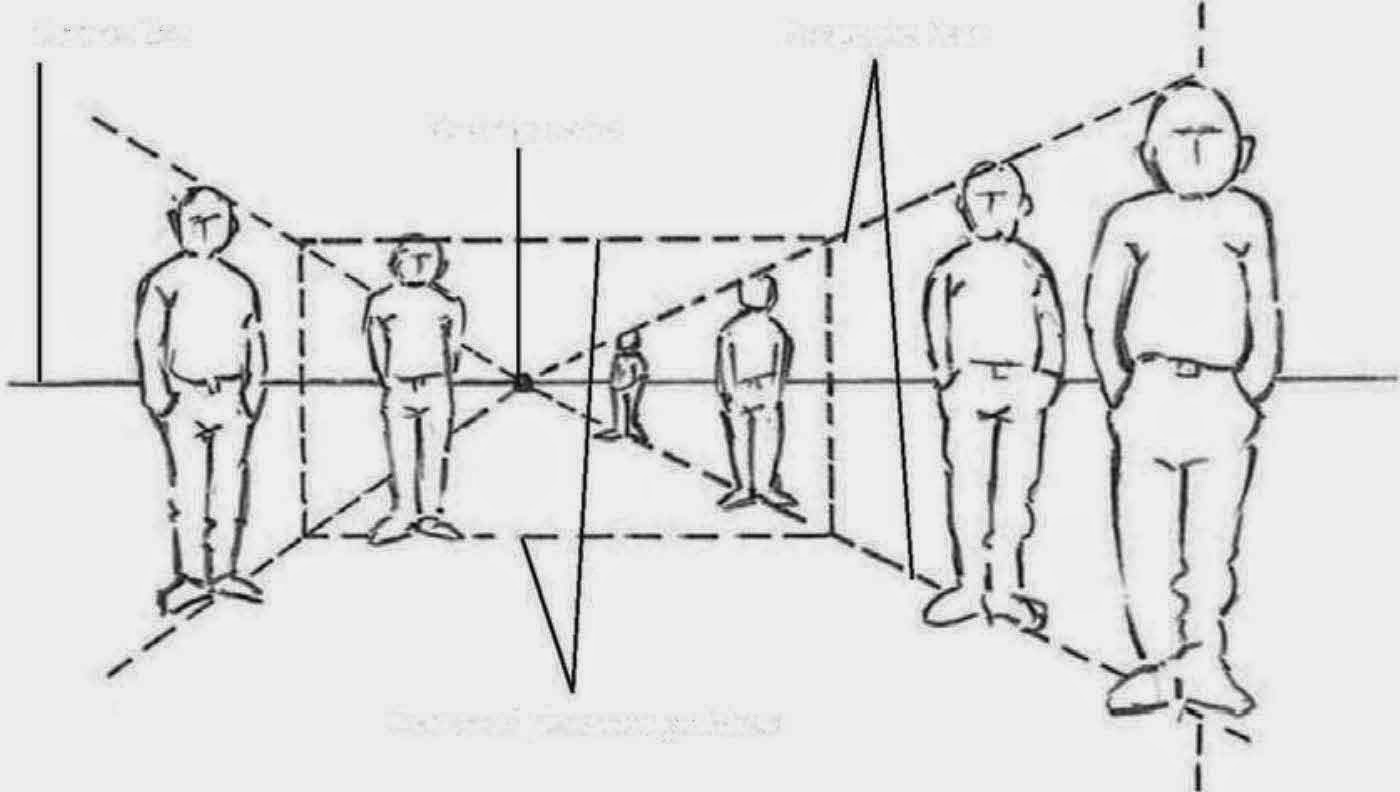
Sizing Multiple Figures For realistic compositions, we need to keep figures in proportion. All the figures here are in pro· portion; we use perspective to determine the height of each figure. Start by drawing a horizon line and placing a vanishing point on it. Then draw your main character (on the right here) to which all others will be proportional. Add light perspective lines from the top and bottom of the figure to the vanishing point to determine the height of other figures. If we want figures on the other side of the vanishing point, we draw horizontal placement guidelines from the perspective lines to determine his height, and then add perspective lines on that side.

 Step One Begin by considering the overall setting-foreground, middle ground, and background-for a subject like these children at the beach. You can use elements from dif ferent photos and place them in one setting. Block in the basic shapes of your subjects; the boy in the foreground is a clipped triangular shape, and the group of children forms a rough rectangle. Determine balanced placement of the two masses of people.

Step Two Next, sketch in outlines of the figures. The little boy with the shovel and pail occupies an area close to the viewer. The three children occupy a slightly smaller mass in the middle ground at the water's edge. Even though there are three children in this area, they balance the little boy through size and placement at the opposite corner. The wave and water line unite the composition and lead the eye between the two masses.

Creating a composition that shows a complete person can be challenging. A standing figure is much taller than it is wide, so the fig ure should be positioned so that its action relates naturally to the eye level of the viewer and the horizon line. To place more than one figure on the picture plane, use perspective as we did with the portrait heads. Remember that people appear smaller and less distinct when they are more distant. For comfortable placement of people in a composition, they should be on the same eye level as the viewer with the horizon line about waist high.
Full Figure Placement In thumbnail A, the subject is too perfectly centered in the picture plane. In thumbnail B, the figure is placed too far to the left. Thumbnail C is an example of effective placement of a human figure in a composition.
Sizing Multiple Figures For realistic compositions, we need to keep figures in proportion. All the figures here are in pro· portion; we use perspective to determine the height of each figure. Start by drawing a horizon line and placing a vanishing point on it. Then draw your main character (on the right here) to which all others will be proportional. Add light perspective lines from the top and bottom of the figure to the vanishing point to determine the height of other figures. If we want figures on the other side of the vanishing point, we draw horizontal placement guidelines from the perspective lines to determine his height, and then add perspective lines on that side.
Line of Sight Figures in a composition like this one can relate to one another or to objects within the scene through line of sight (shown here as dotted lines). You can show line of sight with the eyes, but also by using head position and even a pointing hand. These indications can guide the viewer to a particular point of interest in the composition. Though the man on the left is facing forward, his eyes are looking to our right. The viewer's eye follows the line of sight of those within the drawing and is guided around the picture plane as the people interact. The man at the top is looking straight up.
PLACEMENT OF SINGLE AND GROUPED FIGURES
Artists often use the external shape and mass of figures to assist in placing elements within a composition-individual figures form various geometric shapes based on their pose, and several figures in close proximity form one mass. Establish a concept of what you want to show in your composition, and make thumbnail studies before attempting the final drawing. The following exercise is based on using the shape and mass of Single and grouped figures to create the drawing at the bottom of the page.
Step One Begin by considering the overall setting-foreground, middle ground, and background-for a subject like these children at the beach. You can use elements from dif ferent photos and place them in one setting. Block in the basic shapes of your subjects; the boy in the foreground is a clipped triangular shape, and the group of children forms a rough rectangle. Determine balanced placement of the two masses of people.Step Two Next, sketch in outlines of the figures. The little boy with the shovel and pail occupies an area close to the viewer. The three children occupy a slightly smaller mass in the middle ground at the water's edge. Even though there are three children in this area, they balance the little boy through size and placement at the opposite corner. The wave and water line unite the composition and lead the eye between the two masses.
Step Three Place your figures so that they fit comfortably on the picture plane. Add detail and shading to elements that are important in the com position. Use an element in the foreground to help direct the viewer's eye to other areas, such as the outstretched arm of the boy. Placing the small rock between the middle- and foreground creates a visual stepping stone to the three children at right.
No comments:
Post a Comment